Exchange 2013 Hybrid – Content was blocked because it was not signed by a valid security certificate

Hello again. The last few days have given me lots of new things to do, so apologies if you are being inundated with blog posts!

So today I went to enable a new Exchange 2013 Hybrid configuration. I used the Start Menu launcher for ‘Exchange Administrative Centre’, which to be honest I don’t usually do. This took me to https://localhost/ecp/?ExchClientVer=15. I then went to Hybrid and enabled the Hybrid Configuration. I logged into Office 365 and was greeted by this friendly message of doom:

Content was blocked because it was not signed by a valid security certificate

This error is quite easily solved; do not use localhost as the server name when you access the ECP. Use your client access namespace instead. For example, if my CAS name was mail.misstech.co.uk, I would browse to https://mail.misstech.co.uk/ecp/?ExchClientVer=15.

Just be sure to put outlook.office365.com and your CAS name into your Intranet Zone too or you’ll then get an error about Cookies!

412 - Cookies are disabled

Thanks for reading!

Exchange 2013 installation and annoying Outlook certificate Security Alert

I know, I know….why am I blabbering on about an Exchange version which is 3 years old?! The answer is because I still install it all the time, mainly for the purposes of Exchange Hybrid deployments. And this is probably old news to most of you, but if you didn’t know, Exchange 2013 can be particularly annoying when you first install it.

Once the install is completed, an SCP record is registered in Active Directory for your shiny new server (which still has all of its out of the box settings). If you faff around at all after the installation has completed, drinking tea and making merry at the water cooler, you will find that your users start moaning at you about the certificate errors they are receiving.

Outlook Certificate Error

This is because your new server has, without your consent, started merrily responding to Autodiscover and EWS requests made through Active Directory. This new server doesn’t have your public certificate installed, and also is using internal server names for it’s URLs.

What you need to do on Exchange 2013 to get around this is:

  • Install your trusted 3rd party SAN/wildcard certificate and assign it to the IIS service. Restart IIS
  • Configure, as a minimum, the Autodiscover, EWS and OAB Internal URLs to reflect your Exchange namespace
    • set-webservicesvirtualdirectory -identity ‘Servername\EWS (default web site)’ -internalurl ‘https://namespace.domain.com/ews/exchange.asmx’
    • set-oabvirtualdirectory -identity ‘Servername\OAB (default web site)’ -internalurl ‘https://namespace.domain.com/OAB’
    • set-clientaccessserver -server servername -autodiscoverserviceinternaluri ‘https://autodiscover.domain.com/autodiscover/autodiscover.xml’

This should mitigate the problem while you actually configure your server. Unfortunately it’s just part of the way Autodiscovery works, and personally I’d rather it was this way round, rather than having to remember to enable the SCP record at some point. Because knowing me, I’d forget.

You could also mitigate this problem by following the guidance on my blog post about Autodiscover optimisation and disabling SCP lookups temporarily for your users. If you are going to be using Hybrid in the future, this may be desirable anyway.


Office 365 Hybrid – On Premise Room Mailboxes not available in OWA

I came across an issue today wherein a user whose mailbox was hosted on Office 365 attempted to use OWA to book a meeting On Premise, and was told that there were no rooms available. The list simply didn’t contain any rooms. The Room Mailboxes were synchronised to Office 365 using the AADSync tool, however OWA knew nothing about them. When using Outlook, the Rooms were shown correctly, so this was just an issue with OWA, not with Room Mailboxes per se.

After a little digging, I found the following KB article: https://support.microsoft.com/en-us/kb/2904381 which explains that a Room List should be created and synchronised to Office 365 to get this working in OWA.

However the PowerShell cmdlet in the KB article fell a little short as I had over 100 Rooms to add into the Distribution Group. This was the PowerShell I ended up using:

$members=Get-Mailbox -RecipientTypeDetails RoomMailbox
New-DistributionGroup -Name "RoomList" -RoomList -Members $Members

I then moved the newly created Distribution Group into the correct OU and performed a Directory Sync. The RoomList showed up instantly, but it took 5-10 minutes for it to become populated. Once this was all done, the Rooms were available!

RoomOWA

Script to change Exchange internal URLs

All Exchange consultants will have been through this situation at least once now; a customer is using a split namespace in their Exchange environment with a .local name internally, and due to the new requirements for purchasing SAN certificates, they can no longer purchase certificates with a .local name on them. One way of remedying this is to change all the Exchange internal URLs to use the public name, and add in an internal DNS zone and record to point the public name at the Exchange environment.

Changing the URLs for multiple virtual directories and servers can be a pain. There are many scripts like this out there on the internet, but I frankenstein’ed this one to fit the needs I had. I wanted it to prompt for the server name, public FQDN and autodiscover FQDN and then change the directories on that particular server to reflect the names I had entered. I also love simplicity, so I wanted the most simple script possible. If you wanted to change this to do the external URL’s, then just do a find and replace internal with external! This script will work on Exchange 2010 and 2013.

Also, if you are using a wildcard certificate, be sure to run the below command to force the name match, otherwise you may get certificate errors on your clients!

Set-OutlookProvider -identity EXPR -certprincipalname msstd:*.domain.com

Here is the script I use:

#get variables
write-host "Set Exchange 2010 Internal URLS" –Foregroundcolor Yellow
$urlpath = Read-Host "Type CAS Array FQDN starting with https://"
$autodpath = Read-Hosts "Type Autodiscover FQDN starting with https://"
$CASserver = Read-Host "Type internal server FQDN"
#change urls for all internal directories
Set-AutodiscoverVirtualDirectory -Identity "$CASserver\Autodiscover (default web site)" –internalurl “$autodpath/autodiscover/autodiscover.xml”
Set-ClientAccessServer –Identity "$CASserver" –AutodiscoverServiceInternalUri “$autodpath/autodiscover/autodiscover.xml”
Set-webservicesvirtualdirectory –Identity "$CASserver\EWS (default web site)" –internalurl “$urlpath/ews/exchange.asmx”
Set-oabvirtualdirectory –Identity "$CASserver\OAB (default web site)" –internalurl “$urlpath/oab”
Set-owavirtualdirectory –Identity "$CASserver\OWA (default web site)" –internalurl “$urlpath/owa”
Set-ecpvirtualdirectory –Identity "$CASserver\ECP (default web site)" –internalurl “$urlpath/ecp”
Set-ActiveSyncVirtualDirectory -Identity "$CASserver\Microsoft-Server-ActiveSync (default web site)" -InternalUrl "$urlpath/Microsoft-Server-ActiveSync"
#get commands to to doublecheck the config
get-AutodiscoverVirtualDirectory -Identity "$CASserver\Autodiscover (default web site)" | ft identity,internalurl
get-ClientAccessServer –Identity "$CASserver" | ft identity,AutodiscoverServiceInternalUri
get-webservicesvirtualdirectory "$CASserver\EWS (default web site)" | ft identity,internalurl
get-oabvirtualdirectory "$CASserver\OAB (default web site)" | ft identity,internalurl
get-owavirtualdirectory "$CASserver\OWA (default web site)" | ft identity,internalurl
get-ecpvirtualdirectory "$CASserver\ECP (default web site)" | ft identity,internalurl
get-ActiveSyncVirtualDirectory "$CASserver\Microsoft-Server-ActiveSync (default web site)" | ft identity,internalurl

Hybrid Configuration Wizard and Multiple Domains – Get-FederationInformation cmdlet had thrown an exception

When running the Exchange Hybrid Wizard for multiple domains, you may find it fails and shows you the error below:

Execution of the Get-FederationInformation cmdlet had thrown an exception. This may indicate invalid parameters in your Hybrid Configuration settings.

Federation information could not be received from the external organization.

In addition to this, if you check the Update-HybridConfiguration log file in the Exchange Logging directory, you will find that the failure occurs just after the command Get-FederationInformation is run on one of your domains.

The first test you can run is to login to Microsoft Online PowerShell and try running:

Get-FederationInformation -DomainName domain.com

If this comes back with an error, then you likely have an issue with Autodiscover. It may be that autodiscover is not configured for all your domains, which is quite a common occurrence. There are 2 traditional ways to get around this:

  1. Configure multiple SRV DNS records to point Autodiscover at your primary Autodiscover service
  2. Add all your autodiscover domains to your SAN certificate and configure A records to point autodiscover to the public facing IP of your Exchange server/s

As of Exchange 2010 SP3 UR6 and Exchange 2012 SP1 however, there is a much cleaner way of doing this.

  1. Make sure Autodiscover is configured and working on your Primary SMTP domain (use https://testconnectivity.microsoft.com/ to verify functionality)
  2. Run the HCW (Hybrid Configuration Wizard) for just your Primary domain. This should complete without issues
  3. Go into the Exchange Management Shell on your On Premise Exchange environment and run:

Set-HybridConfiguration -Domains domainb.com,domainc.com,domain.com,autod:domaina.com

Where domaina.com is your Primary SMTP domain. This sets your autodiscover domain for all domains to domaina.com.

  1. Re-run the HCW. You should now see all domains populated and the HCW should complete successfully.

Exchange 2013 Cumulative Update 8 now available

Exchange 2013 Logo

Exchange 2013 CU8 has been made available to the general public as of 17th March 2015. Along with the usual bug fixes, a few minor new features have been announced. From my point of view, the best new feature must be the automatic profile migration for Exchange Active Sync clients when being migrated to Office 365. This was the last piece in the puzzle of Office 365 migration as far as automatic reconfiguration goes, so I’m happy to see this included.

For a full list of updates and bug fixes, you can check out the Exchange Team Blog post at http://blogs.technet.com/b/exchange/archive/2015/03/17/announcing-cumulative-update-8-for-exchange-server-2013.aspx

Download link: http://www.microsoft.com/en-us/download/details.aspx?id=46373

Thanks for reading 🙂

Working with date specific PST exports using PowerShell

With all the various email archiving tools in place across the world, invariably in the world of Exchange consulting we get involved in lots of mass exports/ingestions of data to and from various services. One task which is performed often is exporting mail from Exchange mailboxes from a specific date range.

In order to do this, you first need to have the required permissions to actually export data from Exchange 2010/2013. This is not part of your permission set as a member of the Organisation Management role group (which some admins assume is an account with god level rights). So to begin with, we will run some commands to create a new custom role group, and then add ourselves into said role group. If you try and run the export commands and receive the following error, then you need to follow the below process to setup a new role group.

The term ‘New-MailboxExportRequest’ is not recognized as the name of a cmdlet, function, script file, or operable program.

Open up your Exchange Management Shell (as Administrator of course!), and run the following commands:

New-RoleGroup "Mailbox Import-Export Management" -Roles "Mailbox Import Export"
Add-RoleGroupMember "Mailbox Import-Export Management" -Member DavidD

You will now have the required permissions to allow you to run the New-MailboxExportRequest commands. By the way, this powershell command only became available as of Exchange 2010 SP1 so if you are mad enough to be running Exchange 2010 RTM, this command will not be available.

In order to have access to your lovely new cmdlets, you will need to close and reopen the Exchange Management Shell (as Administrator!). Now you can run the command as shown below, just tweak the settings marked in bold to get your desired effect 🙂 As a side note, the -lt stands for less than, and the -gt is greater than. You can also use -le, which is less or equal to, or -ge, which is greater or equal to.

New-MailboxExportRequest -ContentFilter {(Received -lt '01/04/2014') -and (Received -gt '12/02/2012')} -Mailbox "DavidD" -Name DavidDExport -FilePath \\myserver\pst\DavidDExport.pst

At this stage, I’d like to point out a little gotcha to do with this command. As I am in the UK, the servers I work on are configured with UK regional settings, including date and time. This means that dates are displayed in a DD/MM/Year format rather than the American MM/DD/Year format. If your regional settings reflect the UK configuration, then the trick is to use UK date format but never use a number above 12. So if you were to use 15/03/2015 (15th March 2015) this would queue the request but would fail after a minute or two with the error:

“The value “15/03/2015 00:00:00 AM” could not be converted to type System.DateTime.”

However if you use 12/03/2015 (12th March 2015) this would work and would export the correct date ranges. If you used 03/12/2015 in the UK, Exchange would think you meant the 3rd December 2015. Obviously if you are in the US this is not a problem, but I struggled with this in the UK. If anybody has seem differently or knows a way around this, please comment and let me know! My advice at the moment though is to use UK date formats, but never use a number above 12 for the day.

Once your request has started, you can run the below command to see the status of your request.

Get-MailboxExportRequest

If your request shows a status of failed, use the below command to retrieve some useful information about the failure.

Get-MailboxExportRequestStatistics -Identity DavidD\DavidDExport

Hopefully this can get the ball rolling for you when attempting to export mail out of Exchange 2010/2013.

Thanks for reading!

Rebalance DAG automatically using Task Scheduler

Those of you who manage Exchange Database Availability Groups, particularly in Exchange 2013, will understand the frustration of coming to the office on a Monday morning to find that your Databases have migrated to A. N. Other server because of some scheduled backup or other task which occurred over the weekend.

To solve this problem, we can configure a Scheduled Task to run the RedistributeActiveDatabases.ps1 script, which will balance your databases out based on the Activation Preference set for each server. Before you configure this task, make sure that your Activation Preference settings are applied as per your desired configuration.

For example, say I have a database named MBDB and two servers named Server1 and Server2 (I’m feeling particularly inventive today). To set the Activation Preference for these database copies, I would run the following Powershell command from EMS:

Set-MailboxDatabaseCopy -identity MBDB\Server1' -ActivationPreference 1
Set-MailboxDatabaseCopy -identity MBDB\Server2' -ActivationPreference 2

This configuration will mean that when I run the RedistributeActiveDatabases.ps1 script, the MBDB database will be moved, if required, to Server1, as long as the required Database Mount Dial setting is achieved (the default setting is Best Availability which requires the Copy Queue Length to be no more than 12).

If I wanted to see how my database copies are currently configured, I would run the following Powershell command from EMS:

Get-MailboxDatabase MBDB | fl server, databaseCopies, activationPreference

This would show me all the database copies and their Activation Preference. So we now have our settings configured and we want to setup our Scheduled Task. Open your Task Scheduler and create a new Basic Task. Give the task a name and configure your recurrence schedule for the Task. When you get to the Action menu, choose ‘Start a Program’.

Now we need to tell the task to:

1. Launch Powershell
2. Load the Exchange modules and connect to the Exchange server
3. Run the RedistributeActiveDatabases.ps1 script with the correct switches
4. Supress the confirmation dialog which appears when running the script

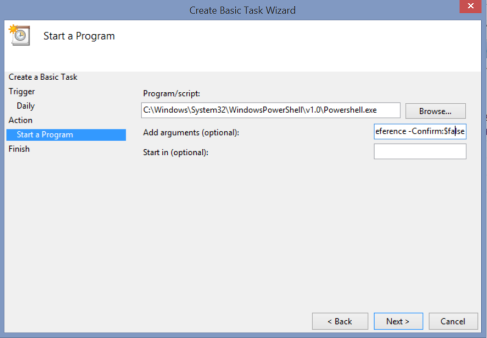
To do this, we enter the details as follows:

  • Program/script:
    • C:\Windows\System32\WindowsPowerShell\v1.0\Powershell.exe
  • Add arguments:
    • -NonInteractive -WindowStyle Hidden -command “. ‘C:\Program Files\Microsoft\Exchange Server\V15\bin\RemoteExchange.ps1′; Connect-ExchangeServer -auto; .’C:\Program Files\Microsoft\Exchange Server\V15\scripts\RedistributeActiveDatabases.ps1’ -DagName DD-DAG -BalanceDbsByActivationPreference -Confirm:$false”
    • Note: Please change the DagName parameter to reference your own DAG!

It looks a little bit like this (OK, it looks just like this):

TaskScheduler DAG Rebalance

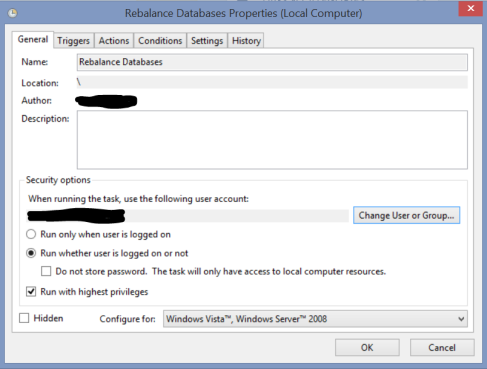
Complete the task creation and then go into the properties of the task. On the General page, configure the task to:

1. Run whether the user is logged on or not
2. Run with highest privileges
3. If need be, change the account running the task to a service account of some kind. That account must be a member of the Organisation Management group

Just like this:

TaskScheduler DAG Rebalance 2

Your Scheduled Task is not configured. You can test it out by manually running it. Hopefully this solves a headache for one or two of you out there!

Resource Mailboxes show availability as Busy

When you create a Resource Mailbox in Exchange 2010, 2013 or Office 365, the default permissions applied to the calendar for the Default user group is ‘AvailabilityOnly’. This means that you can see appointments in the calendar, however you cannot see the subject, attendees, or any further details. When this is being used for a piece of equipment or a meeting room, this configuration appears to be counterproductive.

After all, if you desperately need that piece of equipment (the corporate skipping rope for instance), how do you know who has booked it so you can go and argue with them about who should be able to use it that lunchtime? If you are on the board of a company, how do you know which of your minions have mistakenly booked the meeting room during your monthly board meetings so you can go and give them a verbal warning?

Almost all of my customers ask me these important questions, and the answer is simple. You run the following Powershell command against the Resource Mailbox and set the Default access rights to the more informative ‘Reviewer’ permission. Users can now see the subject, the attendees and the details of the booking.

Set-MailboxFolderPermission alias:\calendar -User Default -AccessRights Reviewer

Powershell. Helping you achieve the unachievable.

Exchange 2013 CU7 and more!

Today Microsoft have released a new slew of updates for On Premise Exchange environments!

There have been various hotfixes and scripts released to fix a multitude of sins in Exchange 2013 CU6, and Microsoft have rolled these hotfixes and more into their latest CU7 release. This update does require a Schema Update, so please run setup /prepareschema first. See https://support.microsoft.com/kb/2986485 for more information. Additionally there are some UM Language Packs for Exchange 2013 CU7 available.

In other news, the Exchange 2010 CU8 update has been recalled at the time of writing and is not available for download. This is because deployment of said update can lead to Outlook being unable to connect to Exchange :-/ If you have already installed, it is recommended that you rollback the update.

Lastly is the Exchange 2007 SP3 UR15 for all those retro Exchange nerds still running Exchange 2007. See KB here for information http://support2.microsoft.com/?kbid=2996150.

Check out http://blogs.technet.com/b/exchange/archive/2014/12/09/exchange-releases-december-2014.aspx for the full rundown!